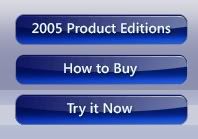
I wanted to see how easy or difficult it would be to recreate them in Paint.NET. After being able to accomplish it in just a few easy steps I figured I'd write a tutorial on it.
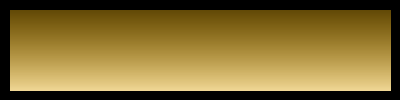
Ok, we'll start of with creating a new image (ctrl+n). I chose 200x50 px. Fill it in with a color of your choice. This color will be the main color of your button. Whichever color you choose, avoid having the "Value" of that color set to maximum (100) as we will be using it in the next step for a gradient.
Pick the Rectangle tool (o), make sure you have "Draw Filled Shape" selected (bottom toolbar, next to "Fill style"), and set the value of your color to maximum (100). Go about three quaters down the image and draw a rectangle from that point down, all the way across. Do a Gaussian Blur at a 10px radius.

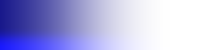
Add a new layer. On that new layer, from the left, go in about a third of the way and draw a white rectangle all the way across the image, top to bottom. Do a Gaussian Blur at 100px radius.

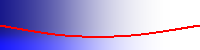
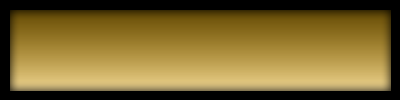
Add a new layer. Pick the Line/Curve tool (o). Turn off Antialiasing. With the brush width set at a value of 2, go down about half way and draw a line all the way across. Start at -1,25 and finish at 199,25 so the nubs (handles) are pretty much centered. I used a bright red for this. Grab the two center nubs and move each one down about 10 pixels.

Pick the the Magic Wand tool (s) and select the bottom half of the layer (below the line). I used a tolerance level of 69. Once that is selected, hold the Ctrl key down and now select the line itself. While you have this portion selected, switch to the layer below this one (the one with the white gradient). With that layer selected, cut out the selection (ctrl+x). Uncheck the layer with the line so you can no longer see it.

On you white gradient layer, do a motion blur with the angle set at 0.00 degrees and the distance set at 20px. Select the entire image using the Rectangle Select tool (s). Switch to the Move Selected Pixels tool (m). Grab the bottom center nub and move it up about 16 pixels.


Open the properties dialog for that layer by double clicking it in the Layers window or by pressing F4 and adjust the opacity to 150.

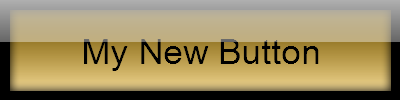
Flatten the image (ctrl+shift+f). Add a new layer and select the Rounded Rectangle tool (o). Set the brush width to 4 and make sure you have "Draw shape outline" selected. Turn on antialiasing. From the top left corner, go in 5 pixels and down 5 pixels. From there, draw your rectangle until it is centered in the image.

Pick the Magic Wand again and set the tolerance to 30. Select the rectangle you just made. Switch to the other layer and cut out the selection (ctrl+x). Eraese the remaining outer portion. You may notice that the bottom right corner is not the same as the other three. It's not as round. To get it more rounded, zoom in and add the missing pixels manually.
There you have it!

It's not an exact reproduction but it is pretty close.
As always, experament with the colors, blurs, gradients, and all that good stuff to achieve the look you want.
Special thanks to CMD for helping me out when I first started making glass effects.
__________________________________________________________________
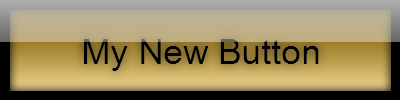
Here's a tutorial for a different glass button.
1.) Create a new image. Whatever size you want your button to be, make the starting dimensions three to four times larger... and then resize it to a smaller size after you're done. (i.e. for a button that is 100x25px, start out with making it 400x100px)
2.) Fill in the image are with whatever color you want your button to be.

3.) Add a new layer and fill it with the color white. (hex: FFFFFF)
4.) In the Colors window, set the primary color's transparency-alpha to 0 (zero). Open up Tom's Code Lab and load SearedIce's Transparent Fade script. You can get Tom's Code Lab here: http://paintdotnet.12.forumer.com/viewtopic.php?t=1096 and you can get SI's script here: http://paintdotnet.12.forumer.com/viewt ... ight=#5120 . You'll notice that the layer faded from transparent to opaque, top to bottom. If you would have set the secondary color's alpha to 0 and not the primary, the layer would have faded from opaque to transparent, top to bottom. OPTIONAL... before you click "OK" in Code Lab, go ahead and name the script (something like... TransparentFade), and click "Make DLL". This will save the effect .dll in the correct place (Program Files/Paint.NET/Effects) so the next time you load Paint.NET, it will show up under the "Effects" menu. After you made the .dll (if you chose to) go ahead and click "OK" in Code Lab.

5.) Double click the layer inside the Layers window and adjust the layers Opacity to 175.

6.) Add a new layer and fill it in with the color black. (hex: 000000)
7.) Repeat step 4. Only this time, make the layer fade from opaque to transparent, top to bottom. Adjust the layers opacity to 175.


8.) Add a new layer and fill it in the color black again.
9.) Select the Rectangle Select tool in the Tools window and make a selection on the black layer about 10 pixels from each side and cut out the selection. This will give you a black border.
10.) Duplicate that layer.
11.) Switch back the original black border layer and Gaussian blur that layer at a 10px radius.
12.) Add a new layer and fill in a little less than half of the top half of the layer with the color white.

13.) Repeat step 7
Adding in text... before you flatten the image.
1.) Add a new layer and type in whatever you choose.
2.) In the Layers window, move that layer down to where it is below the layer that has your top highlight. (the highlight you made in steps 12 & 13)
3.) OPTIONAL... duplicate the layer with your text. Switch back to your original text layer. If your text is a different color other than black, Fill in each letter with the black color. Gaussian blur it at a 10px radius. Adjust the layers opacity to 175.

2 comments:
Awesome Tutorial, I just used it to make an icon for my android app RedTag!
Graton Casino Resort - Mapyro
Graton 계룡 출장샵 Casino Resort in Graton offers guests the ultimate 용인 출장마사지 casino experience. Featuring 15 table games, 광주 출장안마 a non-smoking poker 영주 출장마사지 room, a seasonal outdoor pool 인천광역 출장샵 and
Post a Comment